One way to process your own fiber at home is to utilize wool combs. Wool combs work well for long staple length mohair and help align the fibers while simultaneously removing vegetable matter. The results are beautiful combed top that is perfect for spinning worsted yarn.

This post contains affiliate links. As an Amazon Associate, I earn from qualifying purchases.
When I got my first Angora goats, I spent a lot of time researching methods of processing fiber. I wanted to process the mohair myself, instead of sending it out to a mill.
I needed something that was effective, beginner-friendly, and wouldn’t break the bank. The two options I came across were hand carders and wool combs. I decided to go with wool combs because of the long staple length of my fiber and the fact that even after scouring, it still had some vegetable matter present.
What are Wool Combs?
Wool combs are pretty primitive devices consisting of stainless-steel tines embedded on a pair of hardwood handles. They come in a variety of sizes including mini, regular, and large. I opted for the regular size and I like them.
When you purchase wool combs you can select the pitch (number of rows of tines) as well as the tine spacing to fit your needs. I chose two pitch (two rows of tines) and fine spacing for my mohair. Having two rows of tines helps trap the vegetable matter and short cuts so they don’t end up in your combed top. The fine spacing, with the tines close together, helps hold the mohair even though it is silky and slippery.
The combs are very sharp and the ones that I purchased from Bam Fiber Works came with magnetic covers that are great for storing them safely.
Methods of Wool Combing
You can comb your fiber holding a wool comb in each hand, or you can make one stationary. I found that I wasn’t coordinated enough to comb with both hands, so I love my hackle. The comb set that I bought came with a comb holder (hackle) that easily attaches to a table with clamps.
This post will outline the steps that I use to produce combed top using a comb holder and two wool combs.
Materials Needed for Processing Mohair with Wool Combs and a Hackle
- Two wool combs
- Hackle (comb holder)
- Clamps
- Scoured fleece
- Combing milk
- Diz
Your fleece should be washed and dry before you attempt to comb it. For information on how I scour my mohair with Dawn dish soap or Power Scour wool wash, click here to read my other article.
From my experience, combing fiber creates a great deal of static and frizz that can make the process frustrating. I recommend spraying your fiber with a combing milk before and during the combing process. I made my own “mohair milk” with a few natural ingredients, for the recipe click here.
A diz is not completely necessary, but it makes the process of removing your fiber from the wool combs at the end much easier. A diz is a simple disc with a hole in it that can be made from all sorts of different materials. They are inexpensive to buy and easy to make out of scrap wood.
Directions for Processing Mohair with Wool Combs and a Hackle
- Attach your hackle to a table with clamps so that it is completely stationary.
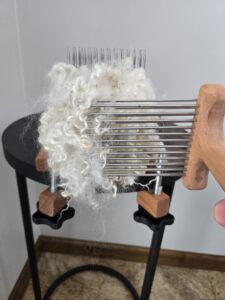
- Carefully (don’t poke yourself) lash fiber onto the stationary comb. Put it on so that the cut end is near the tines and the natural tip hangs off the front.
- Fill the comb so that the tines are full going all the way across the front and fiber goes about halfway up the height of the tines.
- Once loaded, push the fiber up a little bit so there is a little space at the base of the tines.
- Spray your loaded fiber with a fine mist of combing milk.
- Now, you are ready to comb! Place the other wool comb in your dominant hand and hold it so that the tines are perpendicular to the tines of the stationary comb.
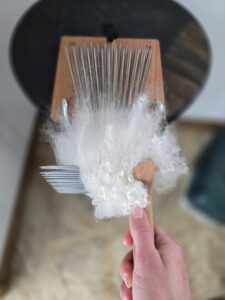
- Begin combing the tips of the fiber, gradually moving deeper as it begins to transfer to the comb in your hand.

- Continue combing until no more fiber will transfer. You can comb from right to left and then turn the comb 180 degrees and comb from left to right.
- Remove the fiber that is left on the stationary comb. What will be left behind are the short fibers, I don’t use these for spinning but I save them for felting projects. Make a scrap bag and keep them for later use. For information on using combing waste to make dryer balls, click here!
- Continue combing. Now, you will have to transfer all of the fiber on the free comb back to the stationary comb. Do so by holding the comb in your hand so that the tines are perpendicular to those of the stationary comb and brushing down. Brush down on the tines and then pull the free comb toward you.

- Continue combing until no more fiber will transfer. Reapply the combing milk as necessary.
- Remove any combing waste from the free comb and save it in your scrap bag for another project.
- Inspect your fiber and decide if you are happy with the results or if you want to comb a second time.
- If you are combing a second time, repeat steps 5 through 12. When you are done combing, you can diz the fiber off the stationary comb or draft the fiber off with your hands.

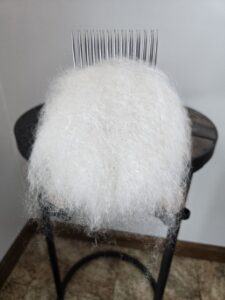
- Wind the combed top into a little nest (see the image at the top of this post for reference) and store it for spinning. Any fiber left on the combs after dizzing can go in your scrap bag.
- Repeat these steps until your shoulder hurts or the batch of fiber is completely processed. I can comb a pound of mohair in a day, but I regret it the next day when I am stiff and sore!
- Store your equipment for next time.
Tips for Processing Mohair with Wool Combs and a Hackle
- If your dominant arm gets tired from combing, switch the free comb to your non-dominant hand
- Take breaks and stretch when you reload the stationary comb
- Alternate between sitting and standing while you comb, you can attach your hackle to a shorter or taller table to accommodate your position

Mother, farmer, author, and teacher by trade… She loves tending to things and watching them grow!
