To improve your times, it’s important that you are able to practice gymkhana events at home with your speed horse. With these directions, you can make your own durable pole bending set. All you need is PVC pipe, cement, and some rubber bowls!

This post contains affiliate links. As an Amazon Associate, I earn from qualifying purchases.
If you have a kid with big gymkhana dreams or your own speed horse, you will want to be able to practice the pole bending pattern at home.
Making this pole bending set is quick and easy and will save you a ton of money when compared to purchasing one.
My dad pounded rebar into the ground 21 feet apart for my pole bending set when I was young. It worked, but it was not the safest for me or my horse.
For my daughter and her gelding, Ranger, I wanted something that was portable, easy to set up, going to give if they hit a pole, and not risk injury to Ranger’s hooves or legs.
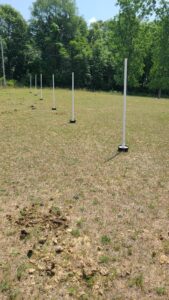
This homemade set checks all of the boxes. It can be moved in minutes for mowing or to set up for other events in your arena, and my 11-year-old can set it up herself. The PVC is light and durable and the rubber bases provide cushion if your horse clips them while running the pattern.
Materials Needed for Making a Pole Bending Set
- 6 4-quart rubber feed pans
- 3 12-foot sections of 1 ½ inch Schedule 40 PVC pipe
- 1 12-foot section of 2-inch Schedule 40 PVC pipe
- Hand saw
- Bucket, stir stick, and water for mixing concrete
- 1 bag concrete mix
- Wire
- Wire cutters
- Power drill
- Drill bits
- Tape measure
Directions for Making a Pole Bending Set
- 1. With the saw, cut each 12-foot section of 1 ½ inch Schedule 40 PVC pipe in half (this will give you six, 6-foot poles which you will need for the pole bending pattern). Set them aside.
- 2. With the saw, cut the 12-foot section of 2-inch Schedule 40 PVC pipe into six 8-inch long pieces (there will be some left over). These will be a part of the base (which will hold the 6-foot pole).
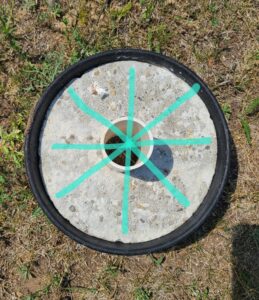
- 3. In the lower half of each of the 8-inch pieces of 2-inch PVC pipe you just cut, drill holes
- 4. Cut wire in pieces about 6-inches long, thread them through the holes you made in the 2-inch PVC pipe. You are making wire mesh to lock the concrete into the base so it doesn’t separate later. The colored lines on the picture below indicate the location of the wire pieces.

- 5. Position one 2-inch PVC pipe into the direct center of each rubber bowl. The wires should be in the depth of the bowl and bent if they try to protrude out the sides
- 6. Mix up the concrete
- 7. Pouring to the side of the bowl, fill each rubber bowl with concrete until it is about 1 inch from the top. DO NOT pour concrete into the middle of the 2-inch PVC pipe! If you do, you won’t have anywhere for your 6-foot pole to sit.
- 8. Adjust the position of the 2-inch pipe if necessary to make sure it is centered
- 9. Allow the concrete to harden
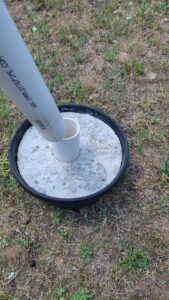
- 10. Assemble the poles by inserting one end of the 6-foot 1 ½ pole into the 2-inch PVC pipe base.
- 11. Practice the pole bending pattern!

The Pole Bending Pattern
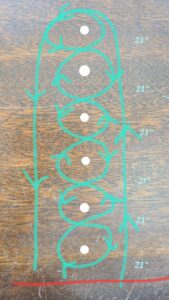
Pole bending is a timed event that involves running beside 6 poles placed 21 feet apart, weaving down through the poles, back through the poles, and running across the finish line. You can start on either the left or the right side, the picture shows how my daughter runs the pattern, starting on the right. The start/finish line is 21 feet from the first pole.


Mother, farmer, author, and teacher by trade… She loves tending to things and watching them grow!
