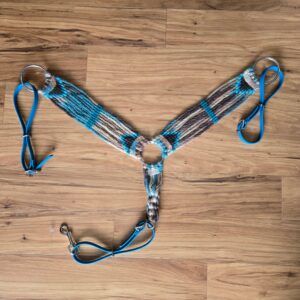
You can weave a beautiful, durable, and breathable breast collar for your horse using mohair cord. Here are the directions for making a 34-inch, standard horse-sized breast collar. The two sides consist of 11 strands of 8-ply mohair, while the down strap is 9 strands with a roper-style finish. Decorate with a design made from 2-ply mohair and attach tugs of your choice.
This post contains affiliate links. As an Amazon Associate, I earn from qualifying purchases.
I have Angora goats and Quarter horses. Making custom tack is a way for me to combine two of my passions!
I enjoy weaving and making beautiful mohair breast collars and cinches. Here is how I made a 34-inch, standard horse-sized mohair breast collar for each of my 15.2hh geldings.
Why Mohair?
Mohair is an extremely strong and shiny fiber made from the hair of the Angora goat. It holds up well to regular use, and as such, makes durable horse tack like breast collars and cinches. It has some give but does not stretch out over time. As a natural fiber, it is soft and breathable and doesn’t make your horse sweaty or irritated. Mohair tack is washable and can last decades with proper care.
Mohair takes dye well, and if colored with a high-quality product, will not fade or bleed color onto your horse during use.
Materials Needed for Making a Mohair Breast Collar
- Weaving loom
- 50 feet of 8-ply mohair cord
- Scissors
- Masking tape
- Measuring tape
- Tapestry needles
- Hemostats or needle nose pliers
- 3, 3-inch O-rings
- 1, 1-inch D-ring
- 2 tugs
- 1 down strap with a snap
- 25 feet of 2-ply mohair yarn
You can buy or make a weaving loom. Mine is made from 1×3 inch hardwood with holes drilled every inch for adjustability to any size project. It has metal hooks to secure your O or D rings for hand weaving.
A standard, horse-sized breast collar measures 34 inches across. The breast collar will measure 17 inches from the middle of the chest piece (one of the 3-inch O-rings) to the middle of the O-ring on either side. You will need 20 feet of 8-ply mohair cord to make each side of the 11-strand breast collar. You will need 10 feet of 8-ply mohair cord to make the down strap that goes between the horse’s front legs. This section consists of 9 strands and is finished roper-style with a 1-inch D-ring.
Tugs connect the O-ring on either side of the breast collar to the saddle and can be made from leather, nylon, or biothane. The down strap can be made of the same materials, but will need a snap to attach to the D-ring on your cinch.
I buy the mohair that I don’t make myself from U-Braid-It supply. Simple stainless-steel O-rings and D-rings can be bought online, just make sure they are heavy-duty. Fancier hardware, chest pieces, tugs, and down straps can be purchased through saddle shops or online equine retail stores.
You will need scissors to cut the mohair, tape to keep the ends of the yarn from unraveling, and a flexible measuring tape for your project. Tapestry needles and hemostats or needle nose pliers are helpful for burying the ends of the yarn when you are finished weaving.
If you want to make a design on your breast collar, you can use any color 2-ply mohair. I used a couple different colors to make decorative arrows and diamonds. Twenty-five feet is enough to make a design on each of the sides of the breast collar.
Directions for Making a Mohair Breast Collar
- Measure out and cut a 20-foot-long piece of 8-ply mohair cord, this will be one side of the breast collar
- Wrap both ends with masking tape so that they do not unravel
- Put a 3-inch O-ring on both the upper and lower hooks of the loom
- Adjust your loom so that the O-rings are 17 inches apart
- Fold your 20-foot-long piece of mohar cord in half, make the right half 2 feet longer than the other.
- At the fold, make a lark’s head knot on the upper 3-inch O-ring
- Take one strand from the first lark’s head knot and thread it through the front of the lower O-ring, pull so that it is snug and make a lark’s head knot
- Do the same for the other strand coming down from the first lark’s head. Now you should have 1 lark’s head at the top and two at the bottom.
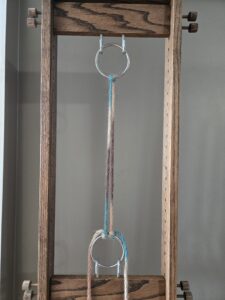
- Tie a lark’s head knot on each side of the first one at the top, make sure to keep the same amount of tension on each of the cords.
- Continue this process until you have 6 lark’s head knots on the upper O-ring and 6 lark’s head knots on the lower O-ring and 11 strands of mohair cord running vertically.
- You should end up with one strand of loose cord (at least 18 inches long) coming off the top and the same on the opposite side of the bottom.
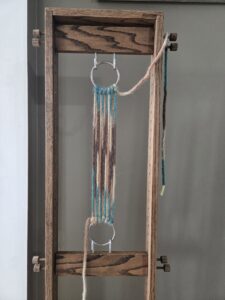
- Cut the masking tape off the end of each loose cord. Unravel the 8-ply mohair into four strands of 2-ply.
- Whip stitch each 2-ply cord at the top and bottom of the loom from one side to the other, across all 11 vertical 8-ply strands. Push them snug up against the 6 lark’s head knots.
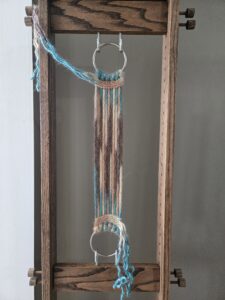
- Now you are ready to bury the ends. I bury the ends by threading each piece of 2-ply cord through a tapestry needle, under the nearest lark’s head knot, and through the whip stiches. If the weave is tight, use needle nose pliers to give you the leverage you need to pull the needle through. Trim the end with scissors.
- Now one side of the breast collar is essentially done and you can make a design on it if you wish. To make a bar like I have in the center, cut a 4-foot piece of 2-ply mohair and fold it in half and twine it under one vertical strand of 8-ply mohair and over the next. To make a triangle, omit one strand after you reach the other side each time. I used 3 feet of the dark brown to make each triangle and 28 inches each of the dark turquoise and light turquoise for the outlines.
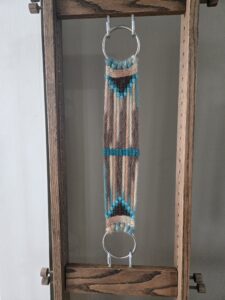
- When you are done using one color of the 2-ply mohair, secure the end by threading it through a tapestry needle and weaving it twice through your design and trimming the end with scissors. If the weave is tight, use the needle nose pliers to give you the leverage you need to pull the needle through.
- Instead of leap-frogging the 2-ply over and under the 8-ply cord, you can also wrap the 2-ply around and come through the back of your wrap to secure the ends. Get creative with the design and don’t be afraid to experiment.
- Once you are done with your design, you can remove the side of the breast collar from the loom.
- Now it is time to make the other side! Decide which end of the piece you just completed will be the center of the breast collar. Put that O-ring on the upper hook of the loom. Put a new 3-inch O-ring on the lower hook.
- Cut another 20-foot-long piece of 8-ply cord and repeat steps 1-18. When you are done you should have both sides complete, and they should be mirror images of each other.
- Now you are ready to make the piece that goes down between the horse’s front legs! Measure out and cut a 10-foot-long piece of 8-ply mohair cord
- Wrap both ends with masking tape so that they do not unravel
- Move the chest piece (center 3-inch O-ring) to the upper hook of the loom. Place a 1-inch D-ring on one of the lower hooks.
- Adjust your loom so that the O-ring and D-ring are 7 inches apart
- Fold your 10-foot-long piece of mohar cord in half
- At the fold, make a lark’s head knot on the upper 3-inch O-ring
- Take one strand from the first lark’s head knot and thread it through the front of the lower D-ring and then back up to the O-ring and make another lark’s head
- With the other strand from the first lark’s head, thread from the back of the D-ring, and then back up to the O-ring and make another lark’s head
- Continue this process of coming in the front and then the back of the D-ring until you have 9 vertical strands. Five of the strands should be in front and 4 in the back, with 5 lark’s head knots at the top.
- You should end up with at least 24 inches of loose cord at the top, on one side and at least 24 inches of loose cord at the bottom, on the opposite side.
- To finish this piece, follow steps 13-14 at the top where the lark’s heads are.
- To finish the roper-style bottom, use your fingers to push the first front strand down and pull the first back strand forward. Push down and pull up every other cord so that now all of the back strands are in the front and the front strands are in the back. Thread the loose end through this space (do not unravel it, leave it as 8-ply) and pull it snug. It will lay horizontally against all the vertical strands.
- Now run your hands up to the whip stitches and then come down to the weave you just did. This will bring the front strands back to the front and the back strands back to the back. Weave the loose piece through this space so it is coming out the side that it started from again. Push down to make the weave nice and tight.
- Repeat this process one more time, pushing down and pulling up every other strand and weaving the loose piece through. You should have the cord woven through four times horizontally when you are done.
- Now you are ready to bury the end. I bury the end by running the tip of my hemostats through the weave and pulling the cord through. I do this twice in two different directions so that it is secure. When it is buried twice, you can trim the end with scissors. There isn’t much room on the down strap so I do not decorate it with 2-ply.
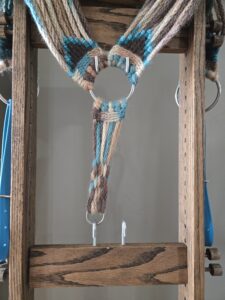
- Now you can remove your completed breast collar from the loom.
- Attach tugs to each side of the breast collar and a down strap with a snap so that you can attach it to your cinch.
- Fit the breast collar to your horse and go riding!

Mother, farmer, author, and teacher by trade… She loves tending to things and watching them grow!
