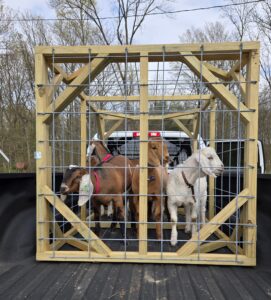
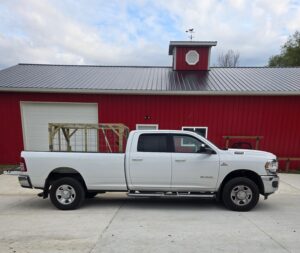
A livestock hauler that fits in the back of a truck bed is super handy for transporting small animals. For those times when you don’t want to hook up the trailer, a stock box works great. Haul small loads of goats, sheep, or pigs with this DIY cattle panel truck carrier. Build directions for a livestock hauler are provided in this post.

This post contains affiliate links. As an Amazon Associate, I earn from qualifying purchases.
Transporting our goats was easy with our old truck. It had a cap on the bed and we could just toss them in and take off. We love our new truck, but without a cap, we knew that we would need to build a crate for the bed to move our goats around when we didn’t want to bother with hooking up the stock trailer.
A livestock hauler that fits in the back of a truck bed is super handy for transporting small animals. It works great for loads of baby goats like you see in the picture. These guys were on their way to be weighed in for the fair.
There are commercially available pickup haulers that you can purchase, but they are a little pricey. I decided to build one myself and it has worked great for our needs.
Below you will find instructions to build a simple box that can help you move any small load of livestock with your truck.
Materials Needed for Building a Truck Bed Livestock Hauler
- Treated 2×4’s
- Table saw
- 2-16ft cattle panels
- Tape measure
- Fencing staples
- Hammer
- 2 ½’’ Deck screws
- Power drill
- Drill bit
- Carpenter square
- Bolt cutters or angle grinder w/ cutting wheel
- 3 hinges
- Swivel staple safety hasp
- Carabiner clip (heavy duty)
- 2- 2 1/2″ Heavy duty eye bolts
- Ratchet straps
The frame of the crate is made from treated 2×4’s. Treated wood is the best option for longevity because this hauler is subject to the elements. I used cattle panel for our stock box because we have large breed goats, if you want something with smaller holes, use sheep and goat panel instead. Do not use construction screws for this project. These will rust and break over time. Deck screws are coated and will last much longer.
Directions for Building a Truck Bed Livestock Hauler
First, you will want to use a tape measure to take measurements of your truck. For the width, measure between the wheel wells to ensure that the crate will fit. For most trucks, this should be around 4 feet. However, the length is entirely up to you. We have a long box, or 8 ft bed, on our truck and at times move multiple goats. I made our crate about 6 feet long. This also allowed us to use 12-foot 2×4’s and cut them in half which minimized waste. It’s all up to you how long you want to make it. For the purposes of this post, we are making a 4ft x 6ft crate that stands 4 ft high.
The next thing you want to do is rip all of your 2×4’s in half with a table saw. This is for two reasons. The cost of lumber is not what it used to be, and you can minimize spending here. Equally important is that this will also decrease the total weight of your crate. This makes for easier handling. The cattle panel adds plenty of extra structural integrity as well.
Now we will make the sides. One 12 ft 2×4 is enough to make your top and bottom plates. Since you ripped it already, you can get four 6ft pieces. These are your top and bottom plates. For the studs, you will need six pieces that measure 44 ½ inches long. For each side of your box, one goes between the 2 plates at each end, and one in the very middle. Pay special attention to the orientation of your top and bottom plate. It matters for your dimensions. For the bottom plate, the cut side from when you ripped it faces up. For the top plate, it faces down. This applies to all parts we are making. Secure them with deck screws.
To make the back, it’s just a 4 ft by 4 ft square. You will need two 48 inch pieces for the top and bottom and two 44 ½ inch pieces to go between them on each end. Secure with deck screws.
To keep the boxes you just made square, add supports in all corners. These are pieces with a 45 degree angle on each end measuring 15 inches, tip to tip. You will put one in each corner on the sides and one in each corner of the back for a total of 12 pieces. Use your carpenter square to ensure the sides are square before securing each one in place.
Now, before you start attaching the sides to the back, it is important to secure your cattle panel to each square (or rectangle). With pounding in all of those staples to attach it, it’s best to have it laying on a hard surface to absorb all the impact rather than risk pounding apart what you have already made if it’s standing up.
Before you pick up your hammer, let’s cut the cattle panel to size and attach it. Take your angle grinder with a cutting wheel, and cut a 6 foot section of cattle panel. Bolt cutters will work for this job too. It’s ok if it’s too tall right now. Lay it on top of one of the sides and ensure it lines up all the way around. It will hang over on the top and that is ok. Secure all the way around with your fence staples.
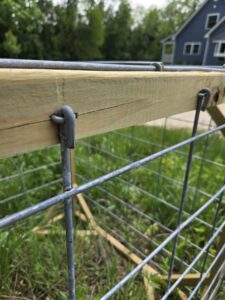
For the part that is hanging over, zip off the horizontal piece of rod and leave about 4 inches protruding above the wood. Once you have done that, bend all of those pieces back down over the staple and it will be secure (see picture below). You can do this wherever the panel is hanging over as you continue this project. Do the same for the other side. Finally, cut a 4 foot section out of the cattle panel and secure it to the back.

Now stand up your sides and attach the back using deck screws. To keep it from racking, I added supports in all corners once they are attached to one another. Again, these are pieces with a 45 degree angle cut measuring 15 inches tip to tip. You will add 4 in this step to ensure the back is square with each side.
Cut three 45 inch pieces to start making the top. One will go between the 2 sides at the very end, one right in the middle between that piece and the back, and one at the very bottom of the front of the box. Secure both in place with deck screws. Add 4 more 45 degree pieces at the front to secure the two pieces you just added to the sides. Cut another 6 foot piece of cattle panel and secure in place. Again, cut any overhanging pieces and bend them over the staple to secure.
Almost there! Now it’s time to make the front. To make sure there was clearance to open the door, I took about ½ inch off the height. You will make it the same way that you did the back, but you now will have two 48 inch pieces for your top and bottom plate, and 44 inch pieces for the pieces between them. Secure them in place and again square it up and put four more of your 15 inch 45 degree corner pieces. Cut another 4 ft section of cattle panel, secure in place with staples, and bend any pieces over that you need to.
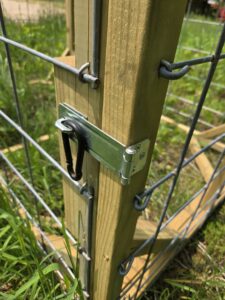
Now just add your hinges to one side of the door, and your closing mechanism to the other and you are good to go. I used a swivel staple safety hasp and heavy duty carabiner clip on our crate, but a hook and eye closer device will work as well.

I added a 2 1/2 inch eye bolt to each side of the top frame. I use those to run ratchet straps from the truck bed to the crate to keep it in place during transport. You can see them in the photo below.


Butcher, coach, and handyman— there is nothing this man can’t do or fix. He loves the outdoors, playing with his kids, as well as hunting and cooking homegrown or wild meats!
