
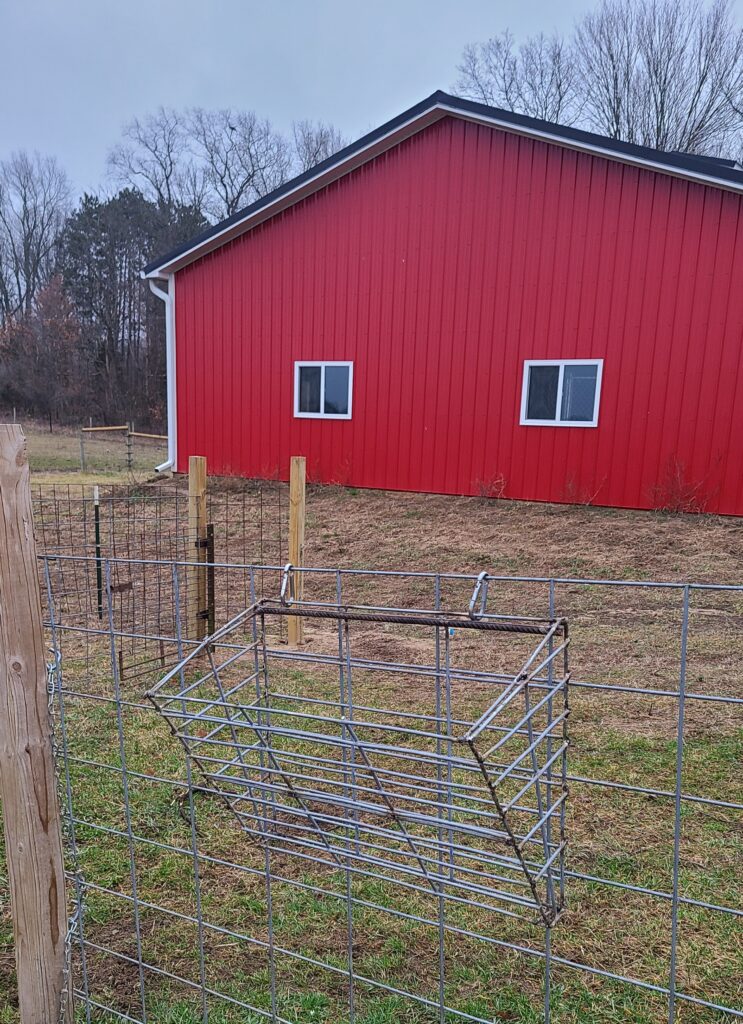
You can make a hay feeder from hog panel with a little bit of welding. This tutorial will walk you through the steps to make a durable, economical hay feeder. Use this do-it-yourself hay feeder for goats, sheep, or other livestock.
This post contains affiliate links. As an Amazon Associate, I earn from qualifying purchases.
If your farm is like any other small farm, chances are you have a fair share of scrap wood and metal lying around. Historically, I couldn’t stand the clutter at times and couldn’t wait to get rid of some of what I deemed to be trash. A trip to the metal yard one day and a fire to burn through piles of wood on another. As our farm grew, I found myself wishing I would have saved some, if not all of it.
Our goat herd is going to double this year. As a result, we found ourselves in need of multiple items such as water buckets, fencing, posts, and hay feeders to name a few. Many of these things are not cheap. It is on this project that I learned the true value of repurposing.
To prepare for kidding season, I divided our horse stalls in half to create individual kidding pens for our mommas. Read more about that project here. What I was left with were pieces of hog panel that I would have previously thrown in a pile for the next trip to the scrap yard. Instead, my wife had the idea of utilizing these scraps to create hang-on hay feeders.
As I looked at the pieces of hog panel, I noted that they were galvanized steel, had equal spacing, and with a little welding, I felt that I could create some semblance of a hay feeder. Much to my surprise, despite me not being a welder in any way shape or form, these turned out perfect. So, don’t let the welding part scare you. And if you don’t have a welder, a friend with one will work just fine.
Materials for Making a DIY Hay Feeder from Hog Panel
- Hog paneling
- An angle grinder with a cut off wheel
- Safety glasses
- A welder
- Welding gloves
- Welding helmet
- Tape measure
- Rebar (optional to reinforce the top)
Before You Start Making a DIY Hay Feeder from Hog Panel
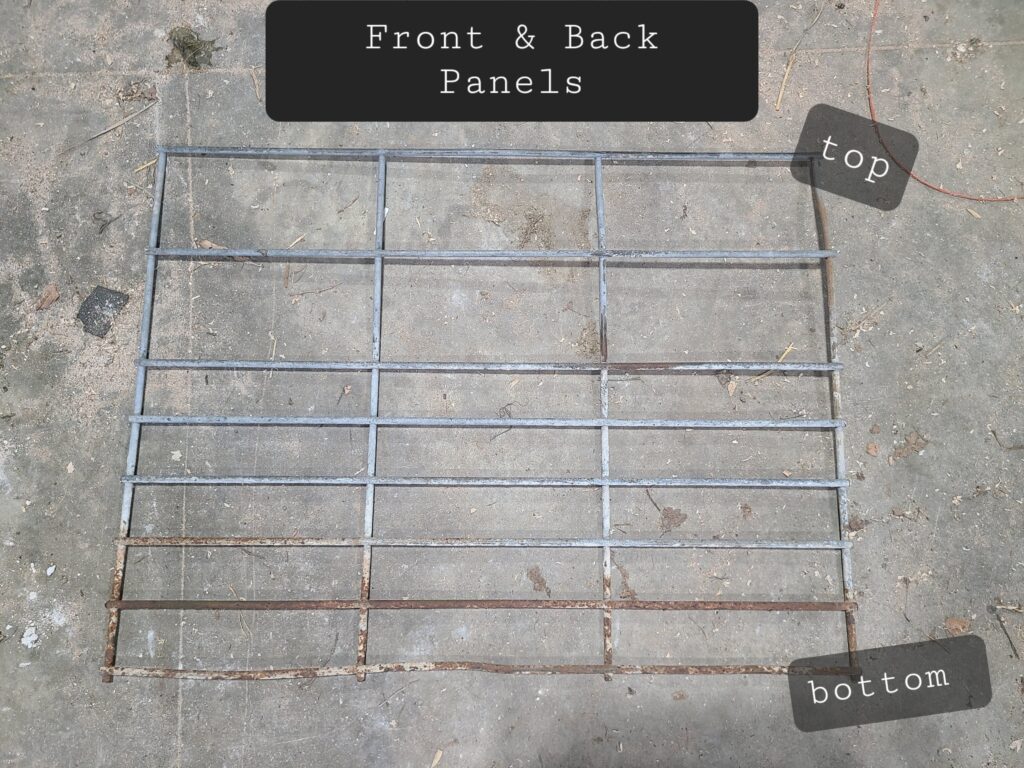
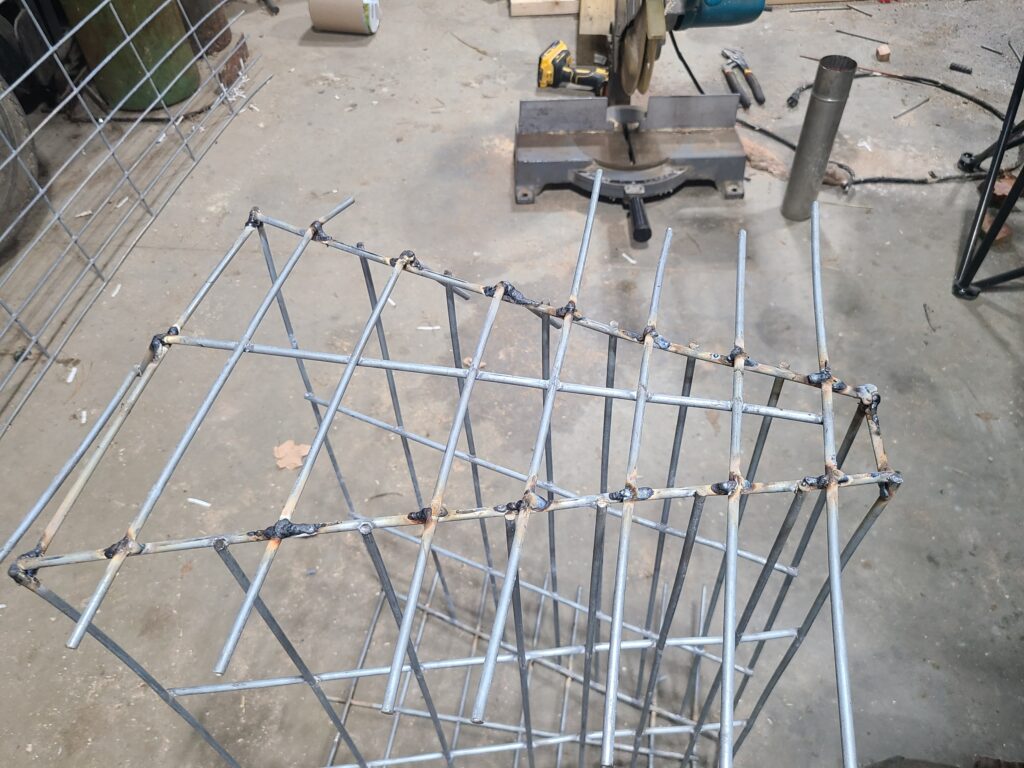
I used one of our previously purchased hay feeders as a template and took measurements from there and adjusted for the size of the holes in the hog panel. What I ended up with was a front and back that measured about 16 inches tall by 24 inches wide.
The width is easy as this is dictated by the vertical rods in your hog panel (about 3 holes wide). One thing to notice on your hog panel is the spacing of the holes. They are much smaller toward the bottom. I opted to use those pieces as much as possible to keep hay from falling out of the larger holes.
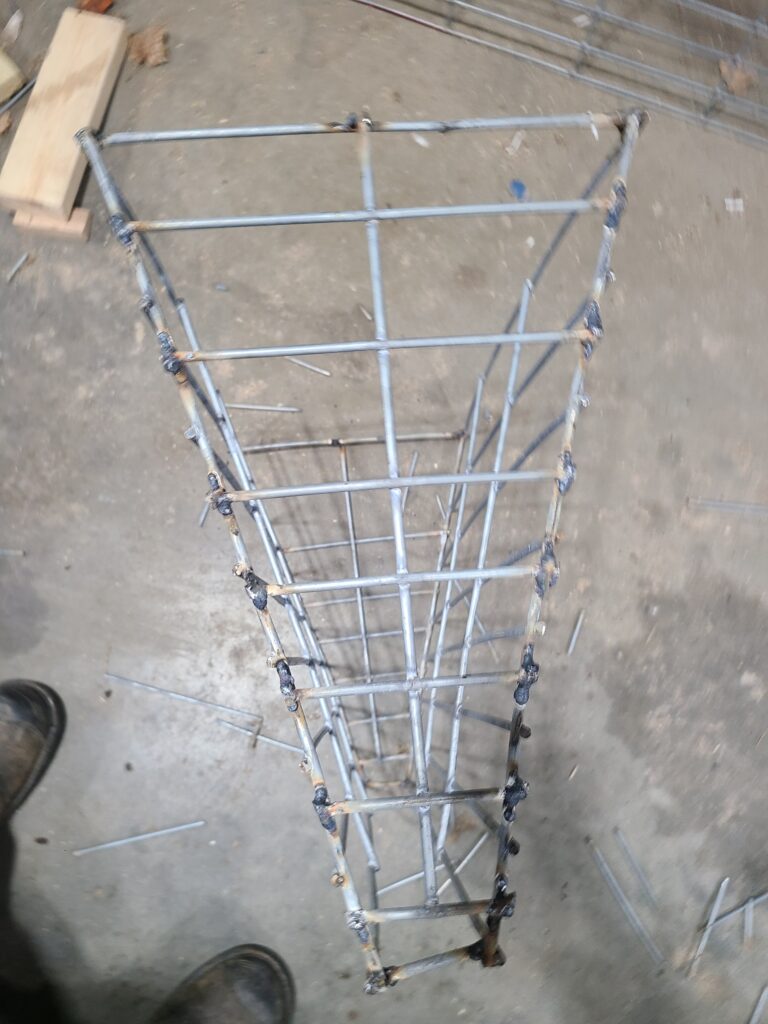
Next, I noticed that the store-bought hay feeder tapers and gets smaller toward the bottom. The bottom opening of the feeder is about 2 inches wide while the top is about 12 inches wide.
One disclaimer. As someone who has both got shavings in his eyes using a grinder, and burnt his cornea using a welder, I cannot stress enough the importance of eye protection throughout this project. Simple eye protection in the form of safety glasses or a proper welding helmet can not only prevent some short-term pain and suffering but also some more serious long-term consequences.
Directions for Making a DIY Hay Feeder from Hog Panel
- Find a decent sized piece of scrap hog paneling
- Using the angle grinder (safety glasses on), cut the front and back pieces. They should be 3 holes wide by 16 inches tall approximately, depending on the cross bars in your panel
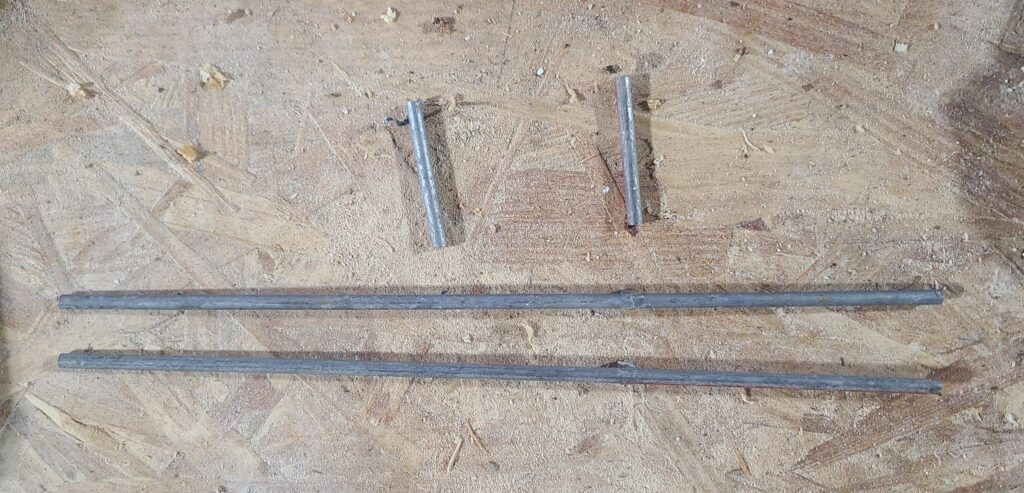
- Next, using the grinder, cut 4 “rods” out of the scrap panel, not your front or back piece. 2 of them need to be 2 inches long, and 2 need to be 12 inches long. These will be the for the bottom of the feeder.
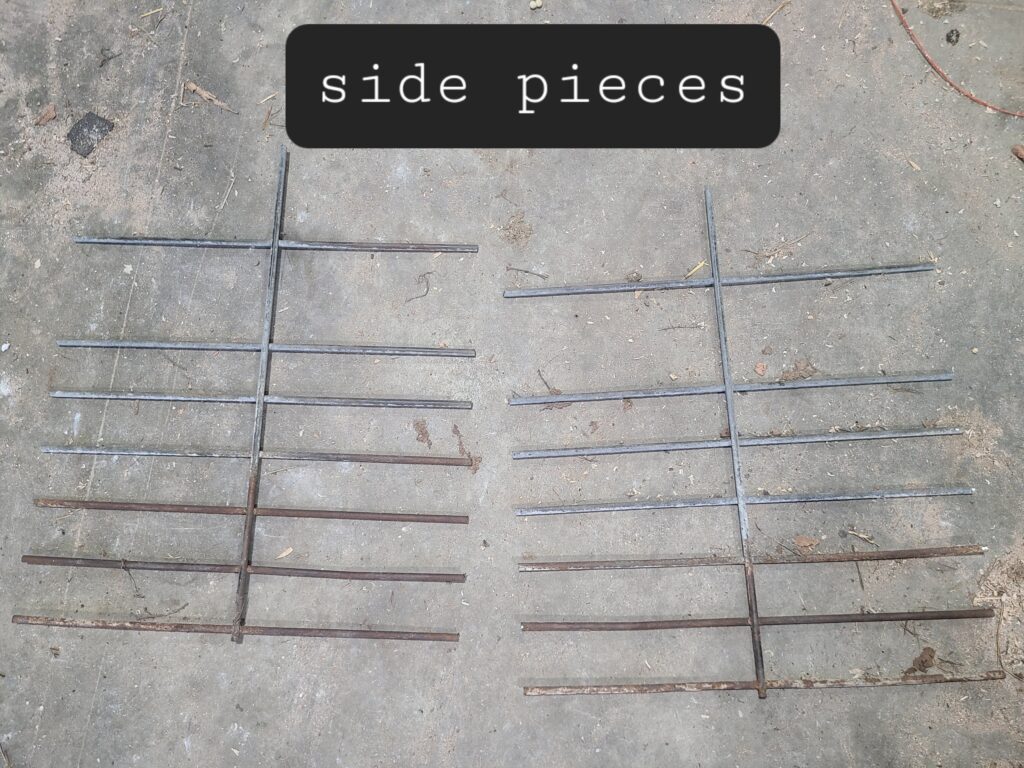
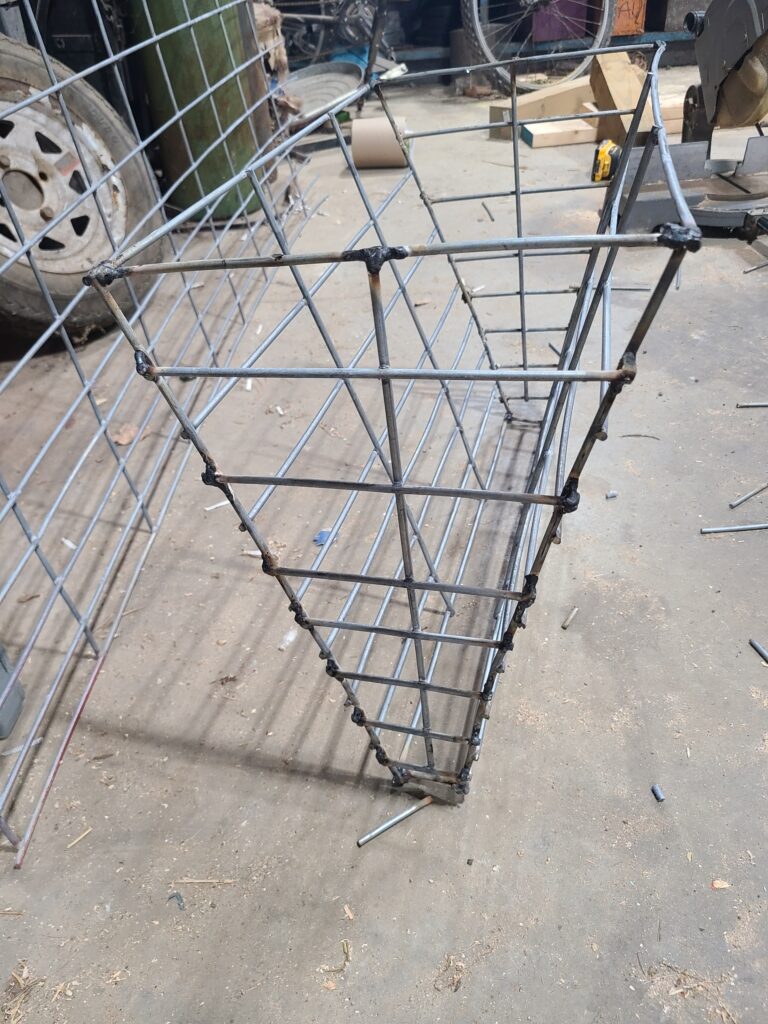
- Next, cut out pieces for the sides of the feeder. Each side should have 1 vertical rod with at least 7 cross-rods going across it. Leave the cross-rods as long as possible when cutting.
- Get your welder ready and put on your welding gear
- Grab the back piece that you cut and lay it flat on the floor
- Weld 1 of the 2-inch rods that you cut perpendicular (pointing straight up) to the bottom corner of the back panel
- Weld the other 2-inch rod to the other bottom corner of the back panel
- Then weld the 12-inch rods perpendicular (pointing straight up) to the top corners of the back panel
- This next part might be easier with a second set of hands; however, it is possible with one person. Take the front panel (3 holes wide by approximately 16 inches tall) and situate it on top of the rods you welded to the bottom panel.
- Complete welds in all 4 corners. What you see now is the general frame for your hay feeder with just the sides to add.
- Place the hay feeder on its side.
- Situate the vertical rod of 1 side piece so that it crosses both the middle of the 2-inch rod and the 12-inch rod you welded on earlier.
- Begin welding these cross-rods to your hay feeder wherever they intersect the front and back panels.
- Once all are welded, flip it over and repeat the process on the other side
- Lastly, using the angle grinder, cut all the rods that overhang the sides flush with the front and back of the feeder. What you have now is a completed hay feeder.
- If you want to reinforce the back panel, measure and cut a piece of rebar and weld it to the top of the back panel.
Final Thoughts on Making a DIY Hay Feeder from Hog Panel
This was a fun project that only took about 45 minutes per feeder. It gave me some much needed practice with my welder, which I could definitely use. Admittedly, the first one took a little longer as I figured out how to make it, but I got much quicker with each rendition.
At $50 a piece in the store for manufactured hay feeders, making 4 of these from scrap I had laying around saved us about $200 total.
The rebar was added to make the hay feeder a bit more rigid. Not sure if this is necessary, but time will tell. Make it your own!

Butcher, coach, and handyman— there is nothing this man can’t do or fix. He loves the outdoors, playing with his kids, as well as hunting and cooking homegrown or wild meats!