How to Build a Walk-in Cooler
A walk-in cooler comes in handy for processing your own wild game or livestock. Learn how to construct a DIY walk-in cooler with the recommendations provided in this post. A materials list and information on selecting and installing a CoolBot are included.

This post contains affiliate links. As an Amazon Associate, I earn from qualifying purchases.
Butchering our own meat started for me at a young age through hunting with my dad. We have never once taken our deer to a processor. Not that there is anything wrong with it, we just never have. The field to table experience is one that I grew to love. That stuck with me into my adulthood, and now onto my own family’s farm. We still butcher our deer as we have always done, but now add to the list goats, pigs, chickens, rabbits, and even steers.
To ensure success with the home butchering of livestock or wild game, there were lots of variables within our control. Sharp knives were bought. Cutting tables were built. For more on my favorite home butchering supplies, click here to read my other article.
But there was always one variable well outside of our control- the weather! Skinning a deer in freezing temperatures is near impossible. On the other hand, warm weather caused us to break a carcass down much sooner than we would have liked. Then one summer, we had to butcher a pig when the temps were quite high. The fat was rendering, and we couldn’t work fast enough. It was time to build a walk-in cooler!
Planning for Your Walk-in Cooler
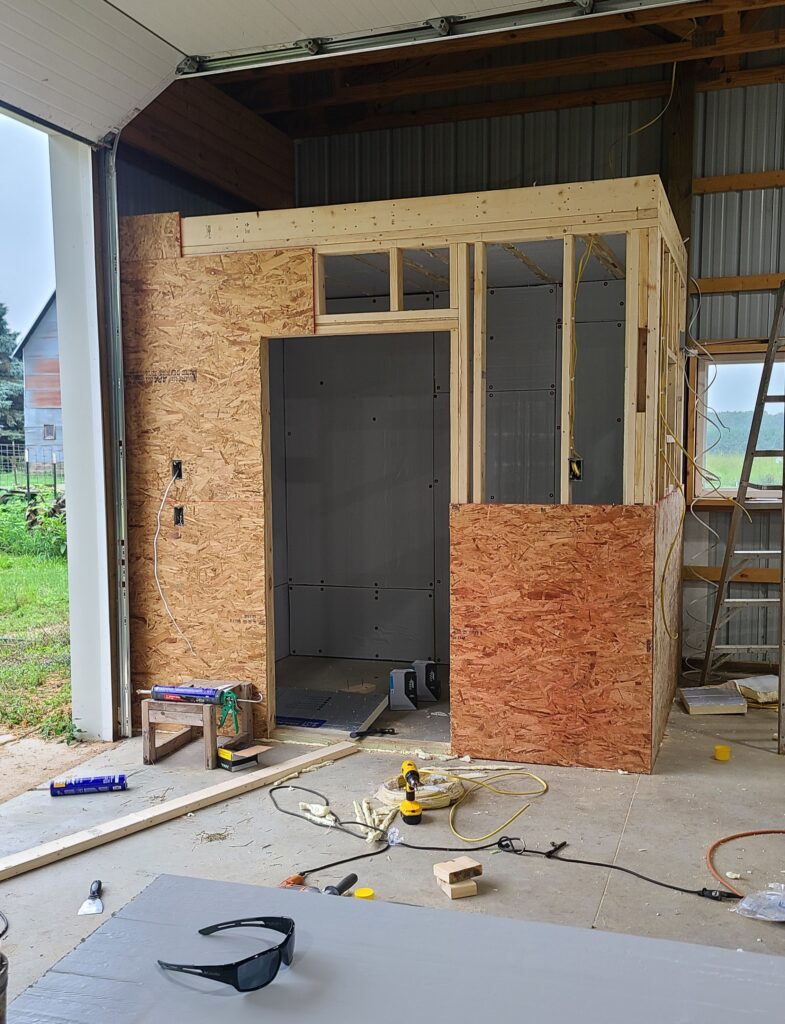
This always seemed like something that would be out of reach but, once we made our plans, it was really quite simple. All we did was claim an 8’x8’ corner of the barn and we were on our way. Of course, you can make your walk-in cooler any size that you want but this is what worked for us. To give perspective, we have had 8 deer comfortably in there at once and could have squeezed in one or two more.
Walk-in Cooler Materials List
- 2×4 studs (8-10’)
- 2×6 studs (8-10’)
- 2 ½” triple-coated deck screws
- 3-4” cap nails
- Polyisocyanurate insulation board 4’x8’ (r-value 13)
- Foam board construction adhesive
- Insulation foil seam tape
- Foam backer rod
- 6-8” lag screws
- Stainless steel threaded pipe
- 90-degree pipe fitting
- Tee pipe fitting
- Floor flange pipe fitting
- Air conditioner (appropriately sized)
- CoolBot
- ½” plywood
- Spray foam
- Some power tools
- Fiber reinforced plastic (FRP board) *optional but recommended*
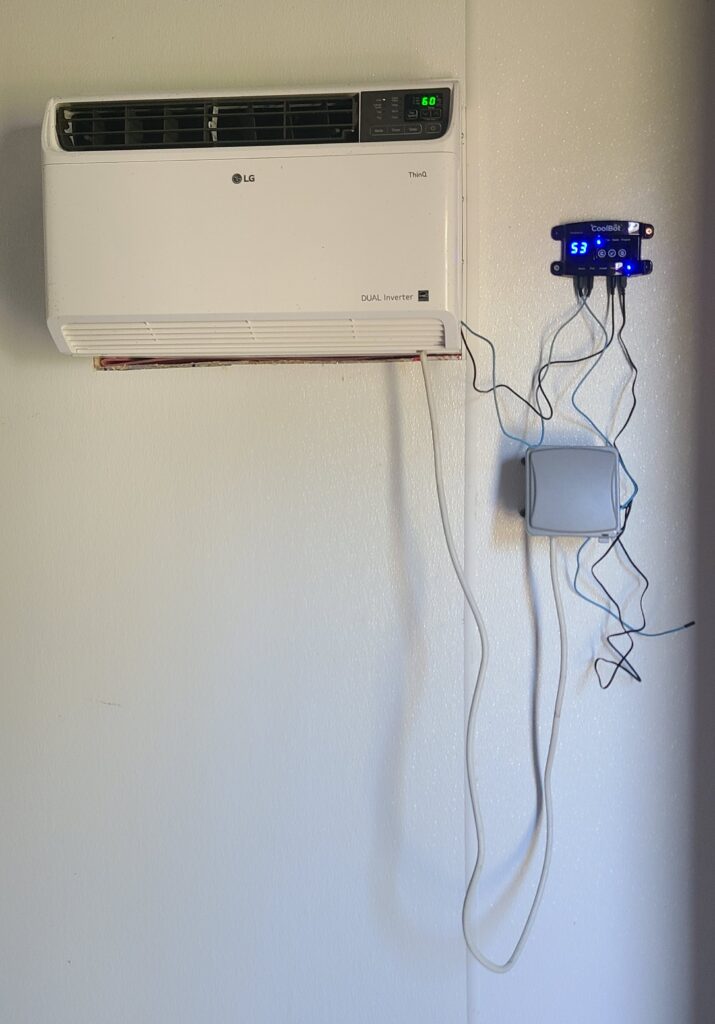
About CoolBot
So, let’s get started. First, order your CoolBot. This is what will hook to your AC unit and allow you to keep the walk-in cooler at consistently cold temps. You can use our referral link here for $25 off the purchase of your unit.
On the CoolBot website, there is a calculator (linked here) that will help you find the appropriately sized AC unit for your cooler. The recommended BTU will be based on your dimensions. A larger room equals more BTUs- makes sense. This is important as you need to pick out your AC unit and know the dimensions to frame into your wall.
Walk-in Cooler Build Instructions and Recommendations
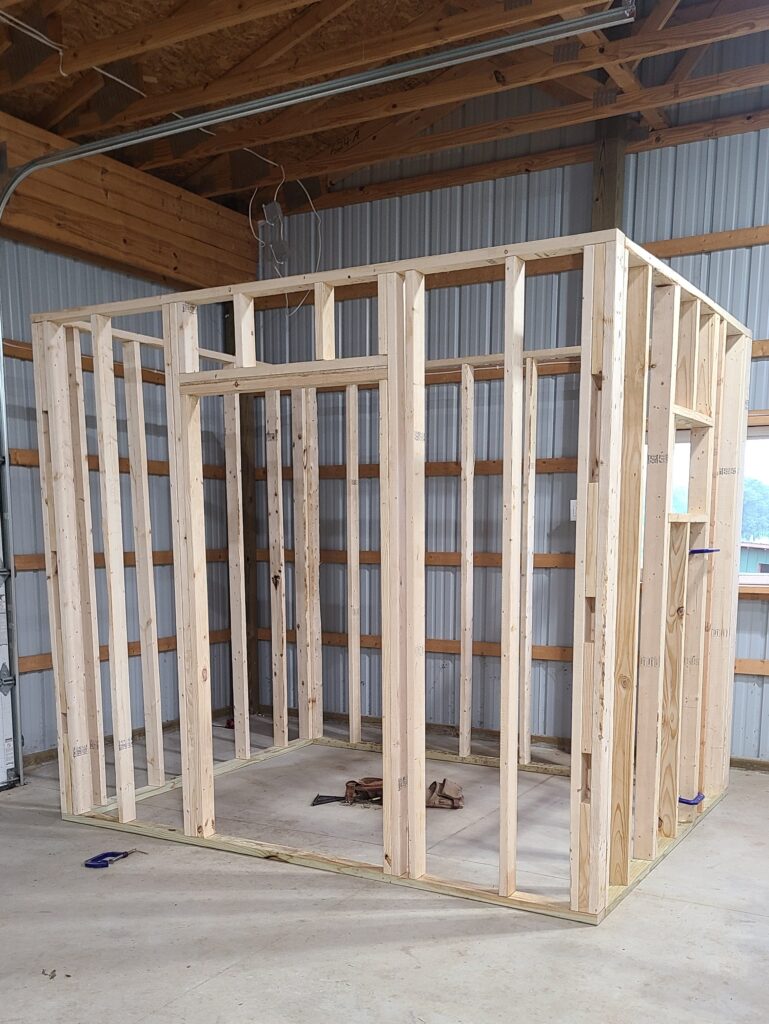
Next, you will need to build your four walls. Keep one thing in mind- you will lose some space due to the thickness of insulation on the inside of your walls. Each wall will have about 3-5” of insulation on the inside of them, meaning you will lose 6-10” off the length and depth. You will also lose 3-5” off your height due to the insulation on the ceiling. Figure this into your dimensions.
For the front and back of the walk-in cooler, build two walls exactly the same length with studs on 16” centers just as you would any wall for your house. Don’t forget to frame in a door. Next, figure your depth and build one wall in the same manner. For the last wall, you will need to figure where your AC unit will go, and frame this in as you would a window. Pretty simple but keep the dimensions pretty tight as you want minimal air loss. You want this cooler to be sealed up tight! Now stand up your walls, square them, and screw them together.
For the ceiling, again, run your 2×6” joists across the walls, on 16” centers, and toenail them into the top plate of the wall. Leave them 1 ½” short on each end. Run a 2×6” skirt board around all the joists and screw to the joists, and toenail to the top plate of your wall. Now the ceiling joists are in.
Ensure the entire structure is plumb and square and sheet the entire outside with ½” plywood. This will stiffen the whole thing up. Our walk-in cooler is inside the barn, so we stopped here. If yours is outside, you may want to consider some form of siding to protect from the elements. If you built this on a slab of concrete, which we did, you can also anchor it down with Tapcon screws, which I recommend.
Now, install your air conditioner. Just put it in the framed spot and secure it with screws. It should have flanges on the side. Just a couple screws should do it. Fill all air gaps around your AC unit with the backer rod. Stuff as much of that in there as possible. No air leaks!
Before you insulate your walk-in cooler, now is a good time to get your electric work done. You will likely want a light of some sort. I put one in the ceiling with a switch on the outside of the cooler. You could also just use a plug-in light if you didn’t want to cut a hole in the ceiling. I also put four outlets in the cooler itself for the CoolBot and the AC unit. Get that wired in or at least figured out before adding insulation.
Now, it’s time to insulate. Put a generous amount of foam board construction adhesive on your wall studs and place your poly-iso foam board in place. Nail them to the studs with the cap nails. Do this all the way around and ensure you leave the cutouts for your door and AC unit. Foam board the ceiling as well. Fill all the joints with spray foam and let dry. Once dry, foil tape all seams including the corners.
The insulation board has an R-value which is a number given to show how well it insulates. Poly-iso has a high R value, around 13, which is why I chose to use it. CoolBot recommends a total R-value of at least 25 to ensure the walk-in cooler is well insulated. Using two layers gave us a total R-value of 26. Put construction adhesive on the poly-iso that you just put in place and begin to place another layer with one important difference, stagger all your joints. This helps ensure there are no air gaps. Spray foam the joints, let dry, and tape them off. The second layer for the ceiling is the only exception. For this, you will not attach the second layer to the inside of the cooler. Instead, you will climb on top and cut pieces to fit between the joists and on top of the first sheet you placed. Once in place, spray foam all gaps and be generous with it. You can then put plywood sheeting over the top.
It’s good practice to insulate the floor, so we did. I just put one layer of poly-iso on the floor. I then spray foamed the gaps, and covered the whole thing with ¾ tongue-in-groove plywood sheets. To make it easier to clean, I then put a coat of garage floor paint on it. Good enough.
Lastly the door. You could buy one, but they are expensive. What we did is sandwich two pieces of poly-iso together between two sheets of plywood. We wrapped the edges in aluminum flashing to protect it and used lag screws to keep it together. Nothing fancy but it does the job well. The inside of the door jamb extends out about 1 inch on all sides for the door to close against. We attached backer rod in two strips all the way around to act as a gasket to prevent air leaking in or out.
For the fiberglass reinforced plastic (FRP), I mentioned above that it is not necessarily needed. You could leave the walls with exposed poly-iso board. However, we wanted to protect it. In addition, we wanted something easy to clean. The FRP board fit the bill and was mounted to all walls and the ceiling. You do have to use FRP cement as regular construction adhesive can degrade it and doesn’t work well. These sheets are pretty floppy, so an extra set of hands or two would be helpful for putting these on.
Now just follow the directions that came with your CoolBot for install and your cooler is all set and ready to go!