You can use your mohair combing waste or any scrap fiber to make ecofriendly and functional dryer balls. Dryer balls are easy to create and can be used for years to reduce wrinkles and drying time in your laundry. This simple felting project is perfect for beginners interested in fiber arts.

This post contains affiliate links. As an Amazon Associate, I earn from qualifying purchases.
I raise Angora goats and process their mohair on my farm. When I finish combing a fleece with my wool combs, I have a considerable amount of fiber left over that is not ideal for spinning. Instead of throwing it out or using it as mulch, I make it into dryer balls.
Benefits of Natural Fiber Dryer Balls
Dryer balls are amazing! Dryer balls absorb some of the moisture from your load of wet laundry and reduce drying time. They are pretty heavy and as they roll around in the dryer, they help reduce wrinkles and static in your clothing. Not only that, but they can be infused with essential oils to provide a fresh scent to your clean laundry.
Ditch the chemically laden fabric softeners and dryer sheets and go the non-toxic route with dryer balls! Natural fiber dryer balls are eco-friendly and sustainable. You can save on energy costs and reduce waste in your home by using dryer balls in your laundry routine. An added bonus is that when you are done with them, they are compostable and biodegrade.
Types of Fiber to Use to Make Dryer Balls
You can make a felted dryer ball with any kind of natural fiber. I use mohair, but you can use wool, alpaca, or a blend of different fibers. You can use roving, combing waste, or even yarn to make a dryer ball.
Make sure whatever fiber you choose is 100% natural, as synthetic fibers will not felt or provide the same benefits of use.
Materials Needed for Making Felted Dryer Balls
- Natural fiber
- Felting needles
- Felting tool
- Felting mat
- Felting finger protectors (optional)
- Felting design template (optional)
- Flexible fabric ruler
- Pantihose
- Acrylic yarn
- Scissors
- Washing machine
- Dryer
- Essential oils (optional)

You will want to make your dryer balls from a fleece that has been washed and dried. For instructions on scouring fleece with Dawn dish soap or Power Scour wool wash, click here. Your fiber will felt better if it is somewhat processed, with the lock structure open, for directions on using wool combs on your fiber, click here.
I made three large dryer balls with about a half pound of mohair combing waste. Depending on how many and how big you want your dryer balls, you may use more or less fiber.
You can use any size of felting needle to make your dryer balls. I have small, medium, and large felting needles and I have used all of them to make a dryer ball without any issues.
A felting tool works great to secure the needles and make them easier to handle. I have a single needle tool and a multi-needle tool and use them both for making dryer balls.
A felting mat will give you something to rest your ball on while you felt and prevent you from poking yourself.
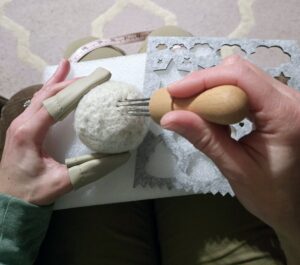
I recommend using felting finger protectors while you are making the dryer balls. Felting needles are extremely sharp and it is easy to stab yourself! I wear them on the thumb and index finger of my non-dominant hand while I am felting. Mine are made of leather and they work well and are comfortable.
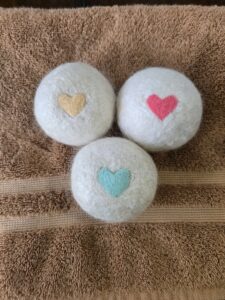
If you want to make a design on the surface of your dryer ball a template is helpful. I made the heart shapes on my dryer balls with a template. You can freehand your own design or omit the design altogether, the choice is yours.
A flexible fabric ruler can be used to check the size of your dryer balls and help ensure uniformity. I felted my dryer balls until they were 10 inches in circumference.
Once you are done needle felting your fiber, you will use a pantihose to run the dryer balls through the washing machine. Acrylic yarn is used to separate the balls from one another during washing. Acrylic yarn wont felt or stick to the balls, so it is easier to use.
Once washed in the washing machine and dried in the dryer, you can cut the pantihose with scissors, admire your work, and start using your dryer balls.
If you want to add scent to your dryer balls, a couple drops of essential oil will do the trick. The dryer balls can be “recharged” with essential oils periodically.
Directions for Making Felted Dryer Balls
- Put on your finger protection and place your felting mat on a flat surface (I usually just use my lap).
- Take some fiber and wind it into a tight ball, hold it in your non-dominant hand.
- Using the felting tool in your dominant hand, start felting the ball so that it holds its shape. You will poke into the ball and remove the needle all over the surface. Rotate the ball so that all surfaces are covered, and it maintains its circular shape. If your ball becomes misshapen, felt the areas that stick out with increased pressure.
- Add more fiber to the ball and repeat the process.
- Using the flexible fabric ruler, check the circumference of your ball each time you go to add more fiber until it is the size that you want. The balls will shrink in the washing and drying step.
- Once your ball is the right size, you can decorate it with a design. I used colored wool roving and a template to make the hearts on my mohair dryer balls. I placed the template on the desired location of my dryer ball and felted the colored roving into the space with my single needle felting tool.
- Now you are ready to complete the felting process by washing your dryer balls. Prepare the balls for washing by placing them into a pantihose.
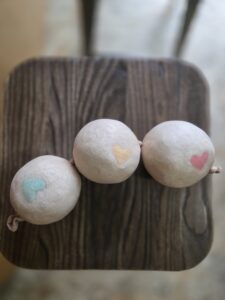
- Separate the dryer balls in the pantihose but cutting and tying a piece of acrylic yarn in between them.

- Wash your dryer balls (inside the pantihose) in your washing machine. I wash my new dryer balls with a load of towels on the hot water setting. The hot water and agitation of the washing machine cycle will help to completely felt your dryer balls so that they do not come apart. I wash my dryer balls twice before putting them in the dryer.
- Dry your dryer balls (still inside the pantihose) in your clothes dryer with the load of clean laundry. I run my dryer on the hottest setting twice to help finish felting and drying them.
- Remove your dryer balls by cutting the pantihose with scissors and popping them out. They should be dense, round, and fully felted. If for some reason yours are not staying together, another trip through the washer and dryer should help.
- If you want to scent your dryer balls, put a drop of essential oil on the ball surface in a few spots. I use lavender essential oil on mine and they smell heavenly!
- Use your dryer balls in the next load of laundry that you do.
How to Use Felted Dryer Balls
Using your natural fiber felted dryer balls couldn’t be easier! All you need to do is add three or more dryer balls to your clean, wet laundry and run your dryer as usual. Make sure to store your dryer balls in a well-ventilated area when not in use.

Mother, farmer, author, and teacher by trade… She loves tending to things and watching them grow!
