Soap making is a fun and rewarding hobby, but there are things that can go wrong. This article will help you troubleshoot common soap making mistakes. Learn how to avoid these soap making pitfalls in future pours.

This post contains affiliate links. As an Amazon Associate, I earn from qualifying purchases.
Now that I have a few years and hundreds of batches of cold process soap under my belt, I feel that I can provide some words of wisdom on the topic. I made quite a few mistakes when I first started the hobby of soap making. Like any creative process, you often learn by trial and error.
Let me share a few things I learned the hard way, so you don’t have to!
Soaping Mistake 1: Not Straining the Lye Mixture
If you have found crystal-like white spots when cutting soap that you have made, it may be chunks of undissolved lye. These areas of concentrated lye are not good for your skin and can cause burns. When this happened to me, I grated the soap and rebatched it in a slow-cooker with a hot process method and used it myself- just to be safe.
This mistake can be prevented with a few safeguards. First, make sure that you have dedicated enough time and energy to stirring. The lye should be completely dissolved in the milk or water that you are using before you add it to your oils.
Second, make sure your lye isn’t expired and that it has been stored properly. Expired lye often clumps together. Lye is sensitive to moisture. Once you open a container, make sure you dispense the amount you need and then promptly put the cap back on. Keep your lye in an area where there isn’t a lot of humidity, not under a sink or in a bathroom!
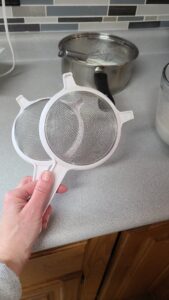
The last measure you can take to make sure you don’t get lye spots in your soap is to strain it right before adding and using your immersion blender. I run my milk/lye mixture through two metal strainers to catch any clumps and keep them out of the soap!

Soaping Mistake 2: Using Cheap Essential or Fragrance Oils
When I first started making soap I ordered a bunch of essential and fragrance oils online. I found that the soap smelled great while I was making it, but after the curing time (4 to 6 weeks) the bars didn’t smell anymore.
I’m not saying that there aren’t reputable or high-quality online sources of essential or fragrance oils, but you do get what you pay for! I have since decided to buy all of my essential and fragrance oils from Brambleberry. Their products are tested in cold process soap making so I know that they will stand the test of time. Further, they put my mind at ease because they are skin-safe, phthalate and paraben free, and made from superior ingredients.
Soaping Mistake 3: Putting Dried Flowers on Wet Soap
Adding dried flowers to the top of homemade soap makes it look so pretty! I love doing it, but ran into problems when I added petals right after pouring the soap. The soap top looked lovely immediately after, but the flowers proceeded to turn brown. The reason this happens is that during saponification, the chemical reaction of soap making, heat is produced and it denatures and breaks down organic material like dried flowers.
To prevent your dried lavender or rose petals from turning brown, you can add them after the soap is cured. I use a spray bottle of rubbing alcohol to moisten the tops of my soap and then arrange the flower petals. When the alcohol dries, the flowers are lightly stuck in place, and they do not discolor!

Soaping Mistake 4: Creating a Partial Gel Ring
If you have ever cut soap that you made and discovered a dark area right in the center of the bar, you probably found what is referred to as a partial gel ring. This shows the difference in heat that was experienced by the soap on the outside versus the inside during the chemical reaction. Having a partial gel ring does not mean that your soap is bad, it can still be used and is as good as soap without a gel ring. The darker, gelled part is actually more solidified and makes the bar longer-lasting in the shower.
Personally, I don’t like how my soap looks with a partial gel, so I consider this cosmetic defect a mistake… you are free to decide for yourself. To prevent partial gel rings, it is helpful to soap at lower temperatures. I aim for between 65 and 85-degrees Fahrenheit for my lye mixture, as well as my oils, when combining. In addition, I put my freshly poured soap molds in the freezer for 24 hours and then let them sit out at room temperature for 24 hours before cutting. Putting the soap in the freezer helps cool the soap more quickly, often preventing it from reaching the gel phase, even in the center of the soap.
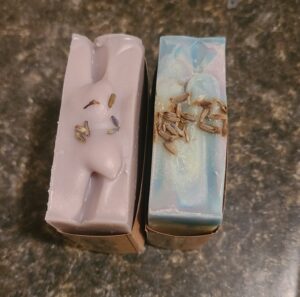
See this issue illustrated in the photo at the top of this post. The soap bar on the left side has a partial gel ring, while the bar on the right side does not.
Soaping Mistake 5: Not Keeping Track of What Soap was Made When
If you make a lot of soap and don’t keep good records it can get confusing determining which ones are fully cured and ready to use. My recommendation is to have a system in place to track when you made each batch so that you can ensure they don’t get used too early. I use a paper planner, but I know that is not for everyone. You can label batches with a sticky note or keep track on your smart phone as well.
Knowing when bars were made can help you decide on a “use by” date as well. Bar soap stays good for a few years when stored properly, so you can use that as a starting point for expiration.
Soaping Mistake 6: Cutting Soap Unevenly
If you are making soap for personal use, maybe having bars of different sizes and shapes isn’t a big deal. However, if you want to sell your soap or just make it look more professional for giving as gifts, you will probably want uniform bars. In that case, hand cutting is not the way to go. It is very hard to cut consistently without a soap cutter.
I have tried box cutters with some success, but I didn’t achieve really clean cuts or uniform bars until I bought a wire soap cutter. The best, but most costly, option for cutting soap perfectly straight and even in width every time is a multi-bar soap cutter where the bars are cut simultaneously.
I hope that some of this is helpful to you and wish you the best in your soap-making adventures!

Mother, farmer, author, and teacher by trade… She loves tending to things and watching them grow!
